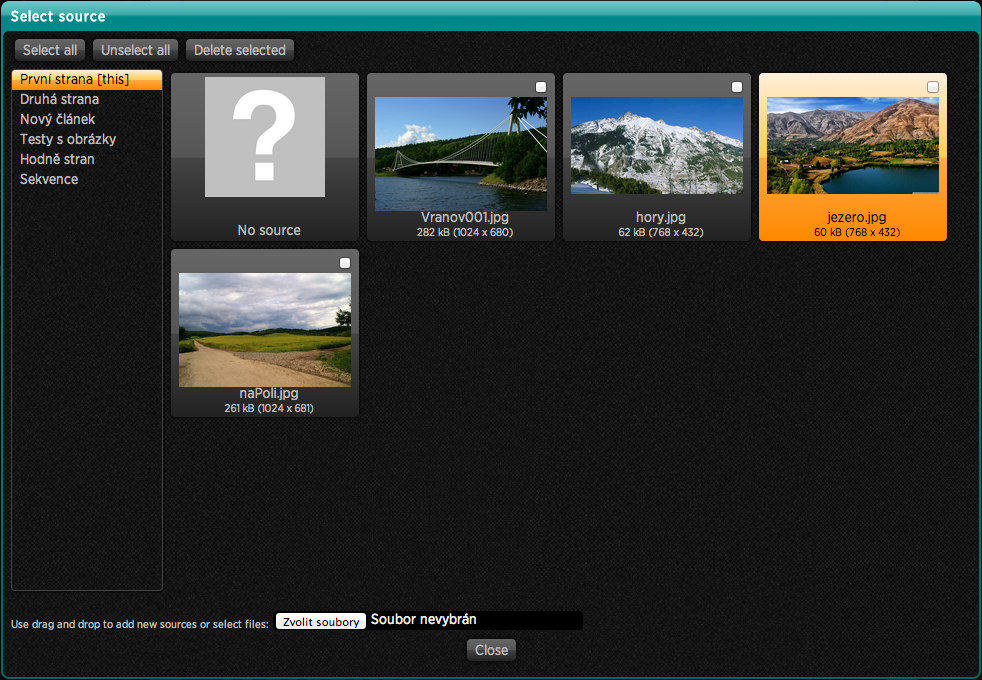
Categories
2. Triobo editor

Audio object

Insert a sound object by using the Audio tool, you can drag the page or click (see Object inserting). The source can be music in MP3 or AIFF or WAV sound formats. The object has the following settings:

  • The icon Triobo audio setting 1 turns on or off audio control display. If controls are not displayed, the audio object is not visible at all and you should make a button for launching.
  • The icon Triobo audio setting 2 is used to turn the repeat audio play function on.
  • The icon Triobo audio setting 3 enables automatic playback when the reader opens the article.
Categories
2. Triobo editor

Article editing, basics

Opening of the article (right arrow next to the article title) will switch the Triobo editor to article editing mode. In the left column you can see basic information:

  • top line with publication name, issue and article. Click on any item will exit the editor and swith you to a view of relevant item. In case of unsaved changes, you will be asked whether you want to actually leave the article.
  • information bar contains:
    • Page: page number (if the article has a number of separate pages)
    • Zoom: zoom settings (magnifying)
    • Guides: guides settings
    • Save button – If it is red, the editor changes has been made and it is necessary to press this button to save – you can use keyboard shortcut Ctrl + S (Windows) or Cmd + S (OS X). While saving the progressbar shows, at this point do not close the browser window!
    • Preview button – opens a separate window simulating the tablet screen of Apple iPad. Using items 100%, 75%, 50% and 25% can reduce the image preview. When viewing a multi-page article, you can move between pages using the up and down keys
    • Close button – closes the article and returns to the overview of articles. If changes areunsaved, you will be asked whether you want to actually leave the article.
  • bar with new object creation functions:
  • Position bar, informs about cursor location

upper menu part of Triobo editor

The page area of an article is marked with white color, objects can be placed outside as well. They will not be displayed to readers, but may serve as a library of your objects – they are readily at hand. Additionally, images placed outside of page area will not be directly shown, however, they may be part of the photo gallery.

There are two types of articles: smooth scroling and paged. Smooth scrolling content has the same width as the size of iPad display and variable height. You can adjust the height with pull bar, which is located below the page. The reader may move smoothly up and down within such article.

Paged content contains multiple pages, and these all are of the same size and exactly fit iPad screens. The reader then does not scroll smoothly through such content, but jumps up and down through the pages. To create a new page in editor click the item Page, where the icon appears to create a new page. If you have increased the page size with pull bar (and article mode is thus smoothly scrolled), you cannot create a new page – first reduce the page size back to its original size. Conversely, if you create multiple pages, the pull bar for adjusting of page size will disappear. Pages can be deleted by selecting them (selected page has a highlighted borders) and in the Page menu, select delete pages. Entire content of seleted page will also be deleted!

In the same menu you can also change the order of pages with icons Change page order

For longer text articles we recommend using smooth scrolling articles.

Categories
2. Triobo editor

Articles division to issues and publications

Your work in a Triobo publishing editor is logically divided into three levels.

  1. The highest ranked is the publication (Publication), typically the specific magazine. For each publication a common list of fonts is established. Later, when you want to publish in your own reader for tablets, it will be connected to just one publication.
  2. Publications may be further broken down to issues (Issues). Typical monthly periodical has therefore 12 issues per year. If your publication is a catalog, individual editions can be either the copies of it (spring, summer, fall …) or perhaps the subcategories (kitchen, bedroom, garden …). For each issue exists a common set of colors (color palette) and font formating styles. Each edition also represents an essential commercial element from the readers point of view- your reader may download single issues and read them in the reader (whether for free or for a fee). Triobo Single reader enables publishing of just single issue.
  3. Single editions then contain articles (Articles). Each article bears also other properties beside its name (author, section …) and the actual content as well. The reader further proceeds from left to right after opening of edition. If the article is larger than the size of display he may scroll downwards to further content.
Categories
2. Triobo editor

Password change

You may change your password by clicking on the user setting icon User icon. For security reasons you need to enter it twice. You may also change your name (e-mail address that serves for log in and therefore your identification, can not be changed).

User form

Categories
2. Triobo editor

Editor start

Open your internet browser and type in the address http://editor.triobo.com – the login window will appear. Enter your user name (e-mail address is used as user name) and password.

Triobo editor login window

If you select the option Remember me, the editor will remember your computer, so after time you will not have to log in again.

All settings are stored on the server, i.e. if you log in from another computer, you will see the editor in a condition in which it was last left. So you can for example, save the page in your office, go home, log on and join the same work in progress.

After logging in you will see information about the user at the the lower left corner of the screen. Click on the icon Icon user to display the settings where you can select the language version (see also here). If you are working on a public computer (to which anyone else has access beside you), do not forget to log out with Logout link in the lower left corner of the screen.

Categories
2. Triobo editor

Software requirements for Triobo editor

Publication editor Triobo is exclusively internet based application and its operation can manage just any computer with an internet acces and Safari or Chrome web browser. Such browsers can be found in following operating systems:

  • Windows (Vista or latest): use the latest version of Chrome from Google
  • Mac OS X (Snow Leopard or latest): use the default Safari browser, or install Chrome from Google
  • Linux: use the Linux version of Chrome. Note.: available with Linux distributions, for which there is a Chrome in installation package. Generally it is possible to use any web browser that is built on WebKit core, however we do not recommend using derived WebKit browsers (eg Konqueror).

You can download Chrome from http://www.google.com/chrome address – enter this address into any browser that is installed on your computer.

Triobo publishing editor is not designed for internet browsers as Internet Explorer, FireFox, Opera and others – the reason is that the WebKit rendering kernel is required, and the same one is used on tablets from Apple iPad and Google Android. Should the preparation of publication be made in browser that is built on different kernel, the significant differences could arise in appearance between the editor and preview on your computer and tablet.

Warning! Do not use any page increase or decrease using the magnifying function of your browser. The required setting is 100% of the page size.

Triobo publication editor

Categories
2. Triobo editor

Push notification – sending messages to readers

Thanks Triobo digital publishing you can send messages to your readers, called push notification. This service is intended for the notification about the newly published issues (Triobo Start pricing program), but can also be used to distribute any other information that are consistent with the rules of Apple or Google (Triobo Professional pricing program).

Push notification sample

For sending notification see the publications settings, ie where you initially adjusted the fonts. Go to the publications list and click the icon . At the upper part the information will appear disclosing how many devices were registered on the iOS platform and the Android platform:

Informace o počtu registrovaných zařízení

Click on Arrange notification and create notification:

Nastavení push notifikace

Enter the text that will be contained within the message. The message can be up to 170 bytes, but national characters occupy most two bytes, some special characters and more. Information on the number of bytes remaining is shown during message writing within the text field.

If you check the item Set icon badge …, then the information will be sent out informing that new edition was published (only for Apple iOS platform). Above the application envelope a blue ribbon will be displayed to the readers notifying them that new edition was published (if your application is not part of the Kiosk, then over the application icon a red circle with the number 1) will appear.

Checking the box Send only to readers who … ensures that the message will be sent out only to those readers who have not yet downloaded the latest editition.

You can choose whether the report will be distributed to all platforms for which you have a reader, or you can check only some of them.

After pressing Send notification information about successful distribution will be displayed.

Note: Number of registered devices is changing over time: increasing with each new installation, where the reader is allowed to send messages. But it can also decrease in a situation where Apple recognizes at the message sending, that your application has been uninstalled from the device.

Categories
2. Triobo editor

Images

You can insert the image by using Obrazový rámec tool, you can also drag or click on the page (viz Object insertion). Click the Source to display the list of available sources and click the image to select it. Additional images can be added by mouse dragging from Explorer (Windows) or Finder (OS X). More images can be inserted simultaneously.

Nastavení zdroje

You may mark the check box in the upper right corner. You may also use the Select All button to mark all or Unselect all to cancel the selection. Selected images can be all deleted with the Delete selected button. If the deleted image is used in your publication, do not forget to replace it with another one or delete the respective objects from the page.

On left side of the screen you can switch between articles – i.e. you may also use images from other articles. Please pay close attention to the information on using sources from other articles.

Přehled zdrojů

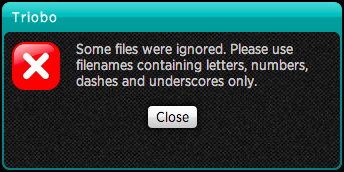
For technical reasons it is not possible to use file names that contain other characters then letters, numbers and hyphen and underscore. These restrictions aply to all sources you upload to Triobo editor (fonts, images, videos…) – system will notify you that file contains forbidden characters.

Please pay attention to the size of image: for your information the file size and image dimensions are displayed under the file name. Dimensions should not exceed the iPad3 resolution , i.e. max 2048 x 2048 pixels. The image size should be as small as possible, especially if there is a lot of them. We recommend the size of about 300 kB in JPEG format, when the quality is still excellent.

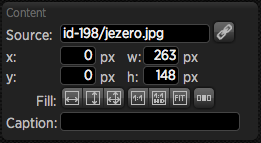
Once you have your image on picture screen, you can double click to open it – you can also make changes of image size, regardless of its frame. Use handles to resize or move the image within the cutout section. In this way you can easily crop images to desired dimensions. If the image frame is open, you can double click it again to go to the source selection dialog.

Orange handles are displayed while image is being edited and same keyboard shortcuts are functional as in setting of ordinary frame: arrow keys cam move the image by 1 pixel (press Alt to move by 8 pixels). By holding down the Shift key the image moves only in one direction, the aspect ratio is maintained with the change.

On the left column you can use buttons to select other image settings:

  • Fill group – determines how the image streches out within its frame.

    • The width () – streching to the width, the height will be adjusted automatically – image may have blank at the bottom edge or can be cut off if the frame does not have the corresponding size. As long as this option is active the image dimensions are changed according to its frame. You can also move the image against the frame and the size will be adjusted accordingly. Once you use one of the image handles the option Fill in width is deactivated.

    • The height () – streching to the height, the width will be adjusted automatically – image may have blank at the right edge or can be cut off if the frame does not have corresponding size. The same rules apply as above: as long as you will not use handless the image size adjusts to its frame size.

    • Both directions () – the image spreads out to the width and height but may be deformed when image frame has different aspects ratio from image. Even in this case the seting will last until you chose other size.

  • The following three buttons serve for setting of other commonly used values:

    • source size 1:1 () – image size within the frame will be set according tho the image source i.e. will be displayed exactly at 100% of size

    • source size 1:1 for mode HD () – some tablets (eg, iPad3 and iPad4) display twice the resolution, for example the area of 300 x 300 pixels in fact displays at 600 x 600 pixels. Pressing this button, adjusts the image size to the source size so the image works well on tablets with high resolution

    • source size according to the image () – image frame will be adjusted according to the size of actual image

If no object is selected, the button Position is available at the panel , which can be used for article setup.

Categories
2. Triobo editor

Variable object – pictures with captions

Variable object may be an interesting element to the reader, because you may choose what information is visible by yourself.

  1. First, using tool Image draw the image frame and select its source.
  2. Draw the text frame using Text tool, write the image caption and format it properly.
  3. Once you are happy with the look, group image with text using Group button (or Ctrl + Shift + G)
  4. Only then click the button Group for setting of variable objects
  5. Now click the button for the situation duplication of variable objects. A new state “State 2” is immediately created and labeled.
  6. Double-click the variable object and then once again to open a group with objects.
  7. Highlight the image and select another source.
  8. Double-click the text label and change it. You can also choose a different location.
  9. Do not forget to see variable object setting