Categories
2. Triobo editor

On tap action

Text objects, images and groups of objects may have configured the action On tap. Click on the item and select one of the following actions:

Triobo on tap action setup

  • Go to website – enter web address that will appear in the browser of tablet reader
  • Prepare e-mail – enter e-mail address, click on the object to open the e-mail application on your tablet with such previously prepared email address
  • Go to page – select the page of given article or next/previous page. Selecting the first page can be used for “go to the beginning of the article,” which may be useful with the multipage articles. For non-paged articles, that are long (and scrollable), you can enter value in pixels, to which it will scroll after the button pressing. Zero Value can be used to return to the top.
  • Go to article – select which article the reader it to be transferred to. You can choose from all articles from given edition. You can also go to the next/previous article. The “to last article” command switches the reader to the article from which the current article originated. It is not possible to switch between different editions.
  • Switch object – switches the variable object. At first on the left side of pertinent object select the action that applies to it (in caase there are more of them on page). Then select one of the following actions:
    • to next – switches to the next stage. If this is the last stage of a variable object, this action switches you to the first state
    • to previous – returns to the previous state. If it is the first stage, this action switches you to the last state
    • to first – switches to the first object
    • to last – switches to the last object
    • to state – offers a list of states so you can choose to which action it should switch
  • Control A/V – controls the video or audio. On the left, select which video/audio you want to select, and then select an action:
    • Play – starts playback
    • Stop – stops playback
    • Toggle Play/Stop – switches playback (if not running then it starts, if running, it pauses)
    • Play full screen – starts playing over the full tablet screen (only for video)
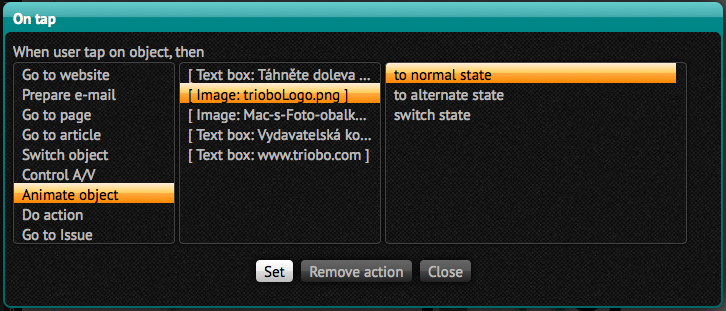
  • Animate object – animates object (see chapter 26. animation). Select the object that has animations set, and then select one of the following actions:
    • to normal state – animates object, which is in alternative state into normal state. If the object is already in the normal state, nothing happens
    • to alternate state – animates object, which is in normal state to alternative state. If the object is already in alternative state, nothing happens
    • switch state – switches between object states
  • Do action – executes selected action: opens dialogue sharing for Twitter / Facebook / E-mail (on Android always induces the system dialog Share) or will go to the issue library
  • Go to issue – moves to selected issue. This issue, of course, must be published openly, otherwise the reader will go to the issue library. If the check box Open if ready to read, issue will be open directly (cover page), otherwise the issue detail page will be shown.
  • Set language – if you have reader application with multilanguage support, thanks to this option you can switch language version directly from your publication.
Categories
2. Triobo editor

Variable objects

Variable object is such a group of objects, in which only one of them is always visible.

First select an object (or group) that you want to use as a variable (multilevel), and then click the icon Variable object icon. The left panel shows a list of „Variable object“, in which all the states will be listed – at the beginning the object has only one state. Now, in this panel, click +, which duplicates the selected state.

Double-click the object (which is now shown as a group) through which you will open the selected state for editing. You can now edit the object which is located in this state: i.e. if it is for example an image, tapping will display a dialog box to change the image source.

Variable object can have any number of states. Their order is set with arrows Order icon status below the list of states. Any state can be also removed by clicking on the cross icon.

Hint: The state of variable object can be a group of objects, such as an image with a caption, or multiple images with multiple texts. It is easier to create variable objects first by creating a typical situation (e.g. grouped file with label). When the condition of variable object is a simple object (text, image …) and you need to add more objects to the state, then first change a single object to a group with Group icon (= create a “group” from one object).

Click on the icon to set the variable object.

Setting properties of variable object

Here you can choose how the variable object will react during browsing:

  • None – the object itself is not active. It is necessary to switch states with actions of other objects (see below)
  • Tap to next state – clicking an object changes the state to the next one
  • Swipe to next/previous state – dragging over the object switches to the next/previous state
  • Switch to state according drag length – dragging over the object gradually switches between states. The Sensitivity item determines the sensitivity. The more the reader drags the more he must to run over with his finger before the next state displays.

Animation between the states Here you can choose which kind of animation will be used during the transition between individual states:

  • None – no animation, the following state is displayed immediately
  • Crossfade – blending
  • Swipe Left/Right – when switching to a state with higher ranking the older status leaves to the left and a newer will come from the right
  • Swipe Up/Down – the same in vertical direction
  • Zoom in – the original state is enlarged towards the user, the new one will replace it from behind
  • 3D – objects are moving in space
  • Quick swipe – quick move left/right with blending

All effects can be set by using the length parameter Length. Length is in seconds.

Item Use State 0 turns on the special State 0, in which there is no visible state of the object. Usage is explained in the article Variable objects, advanced techniques

The Dots item is used to display the dots under the variable object. Use the Color to select the color, you can also choose the background color under the dots by Background, or consequently set the color to [No color]. You can test the dot display in preview to view dots. They appear at the bottom section of a variable object on the strip with a height 16 pixels. If you want to achieve that the dots will not overlap over individual states, you may finally increase the height of variable object just by 16 pixels.

Item * Autoplay * enables automatic switching of individual states after the object is displayed. The speed ​​is defined as the time between the switching of states in seconds.

Alternative creation of variable objects

The second way how to create variable objects is to draw the individual objects separately. Then select them with mouse (in required order with Shift key depressed) and then press the button – individual objects will become individual states, all of them will be placed to the upper left corner of created variable object.

Variable object can also be divided in a similar way as any other group using the Enter image description here button – the states are then displayed net to each other. This may be utilized so that you can edit individual objects and then regroup them into a variable object.

Categories
2. Triobo editor

Images sequence

Another type of object is a sequence of images. This is the frame within which a large number of images can be displayed automatically as a sequence, they can therefore create animations that you have made in some animation program. Properties of object sequences are set in a separate dialog box:

enter image description here

The meaning of individual items is following:

  • Mask of filename – file name of a mask image. When each frame sequence was named as image001.jpg, image002.jpg, image003.jpg … then the text of mask image is image#.jpg – the character grid thus indicates where the image number should be palced
  • Count – image number
  • Number of first – number of the first image, in our case 1
  • Number of digits – number of image digits, in our case 3
  • Autoplay – whether the sequence is loaded automatically after the page starts
  • Speed – interval between two images
  • Repeat – whether the display of final image will be followed with the first one again
  • Tap to start/stop – whether the reader may click on the sequence to start/pause for automatic play
Categories
2. Triobo editor

Locking objects and articles

If you want to prevent accidental edition of any object, you may lock it. You can do this using Ctrl + L (or Cmd + L) shortcuts. Locked object:

  • cannot be moved or its properties set (by mouse, keyboard, entering data)
  • cannot be opened
  • can be duplicated (duplication is automatically unlocked)
  • can be copied into another article
  • cannot be deleted or moved into another article
  • can be grouped with other objects – the resulting group is unlocked (i.e. so you may change position of locked object when moving the entire group)

You can also lock/unlock the layout of the whole article – it can be made by icon/unlocked, which appears next to the article setting in a situation where no object is selected. In locked layout all objects are locked and:

  • objects cannot be duplicated
  • objects cannot be created
  • objects can be only copied to another article
  • objects cannot be grouped (ungrouped)
  • layout properties cannot be set (setting galleries, etc.)
  • when opening locked layout a dialog appears to let you check for errors, but errors cannot be repaired
  • cannot save (there is nothing to save)

If in any unlocked article there are some unsaved changes, the warning will appear when you attempt to lock it therefore you need to save all changes first. You can also lock the entire issue (see Issue properties)

Categories
2. Triobo editor

Working with objects

You can create a new object by clicking icons Text box, New Image etc. The area into which you insert a new object is highlighted with red interrupted border. By dragging the mouse you can then draw new object. As you drag, the object edges snap to the guides. If you click within the area, a dialog box for entering object position and dimension appears, the position is pre-filled and corresponds to the position of a mouse click. Instead of drawing you may directly double-click the icon to create a new object: a dialog box appears where you can enter the coordinates of the upper left corner and object width and height.

Dialog for new object Triobo

Within the section Number of objects you can specify the repetition: the default setting is the location of a single object, but you may want more objects in horizontal and vertical direction. You may also specify a (Gap), space between objects in every direction.

After clicking the text frame setting it will immediately open and will be ready for text input. If you want to repeatedly work with the whole object, leave the text frame open by clicking outside of it.

If you drag the mouse over any object, its outline will appear. Clicking the mouse will mark the object so you can perform other operations.

Position bar will change and will contain the following values ​​that you can modify:

  • upper left corner position x a y
  • width and height labeled by letters w a h
  • rotation in degrees, enter the full values from -360 to 360
  • icons icons for sequence change for changing of objects order on the page. Above objects the overlap will appear with objects placed beneath. You can also use keyboard shortcut Ctrl + arrow up/down (Windows) or Cmd + arrow up/down (OS X)
  • field Title to enter the object name: if you do not name the object, the name will appear automatically here (type object description in square brackets). You can enter your name after clicking the mouse in the box. This is preferred with variable objects, video and audio, as it is easier to refer to them later when starting On tap operation.

The object position may be naturally changed by dragging the object on the page. Size can be changed so that you drag object handles at the corners and sides.

Using rounded handle above the object you can rotate it.

Hint: If you drag an object while holding down the Shift key, the object will be moved only in a horizontal or vertical direction

Hint: If you resize an object by dragging a handle while holding down the Shift key the aspect ratio will be maintained

Hint: If you rotate an object while holding down the Shift key the angle will be changed only in 15° steps.

Hint: The object position can be changed using the up, down, left and right arrows on your keyboard. The object will move by 1 pixel in either direction. If you hold down the Alt key at the same time, the object will move by 8 pixels.

Hint: If the object is partially covered with another and you need to reach its handles, follow these steps: Select the object you want to edit. Next, press and hold down the Ctrl key and click the object that is interfering with editing – the object moves to the background and becomes transparent. Continue to hold down the Ctrl key and then click on the hidden guide to make adjustments. When you release the Ctrl key, the object that was moved to the background temporarily will return to its original position.

With the Design bar you may adjust the object appearance:

  • the central colored box determines and sets the background color
  • surrounding color fields, specify the color of corresponding edge (you may set the color for each edge separately: top, bottom, left and right)
  • numeric field on the edge line sets the width of corresponding edge (again, you can set different width for other edges)
  • numeric field between the central field and margin settings sets the inner indentation of the object in relevant direction (for example, the text can be indented to different values ​​of the left, right, top or bottom within the frame)
  • Set shadow – displays the dialog for entering the object shadow: if the shift within the direction of x and y is entered, then the blur values and color of shadow are adjusted.
  • Opacity – determines the overall density of objects, enter a percentage from 0 to 100
  • Border radius – determines the curvature of edges
  • Fix position – if checked, then the object does not change position when scrolling the article. See article Special advertising
  • On tap – determines what action will be performed after the reader taps on object with finger. Refer to On Tap action.

Hint: to enter values ​​between fields (size, margin width, internal indentation etc.) can be changed quickly with keys Tab and Shift + TAB

If any object is selected, than it is present in the Functions group on functions bar. This allows you to do the following:

  • To Copy or Move the object with the button – it opens a dialog box where in the first column you can enter the issue and in the second column the article of this issue into which you want to copy or transfer the object. If the article has multiple pages, you may want to choose the third column. Action is done by clicking the Copy or Move button.

    • If you copy or move your object within the same article, the action will take place on your computer and will not appear until you save article.
    • when copying an object to another article, then it appears immediately in the target article regardless of whether you save any changes in the original article. The action occurs immediately, you will be notified about this action.
    • If you transfer the object to another article, its copy will be created immediately in the target article and will also be subsequently deleted from original article on your computer. This deletion will not be reflected until you save the article – i.e. you can prevent the deletion when you exit the article saving.
    • A group of objects can be also copied/transferred. If there are not matching styles and colors in the target article, they will be created. If there are already matching styles or colors with same names the target values will be used ​​(for example, text can be reformated according to the target style).
    • When doing copying and transferring, the source files are also copied (images, video, etc.). Sources of the original article are never removed (remember to remove them if they are no longer needed) – read the chapter 17 Using sources from other articles
  • Duplicate button – creates a copy of selected object and retains all its properties

  • Delete button – deletes object. The operation cannot be reversed. You may also use the keyboard shortcuts Ctrl + Delete (Windows) or Cmd + Delete (OS X) or consequently Ctrl + Backspace (or Cmd + Backspace)

Hint: All numerical values ​​that you enter to Triobo (position, size, font size, …) can be changed not only by entering a value, but also by using the up and down arrows – in such case, the value is changed by 1 unit. If you hold down the Alt key, then the value is changed by 8 units.

Categories
2. Triobo editor

Working with multiple objects – alignment and layout

If multiple objects are selected (labeling with holding down the Shift key), a panel for alignment will appear:

Alignment menu

The importance of alignment buttons (Align) is following:

  • aligns selected objects so that all of them will have the left edge on the former left edge position of the group
  • aligns selected objects so that it first determines the vertical axis of objects and further moves each of them in the horizontal direction so that the vertical axis of the object is lying on such axis
  • aligns selected objects so that all of them will have the right edge on the former right edge position of the group
  • aligns selected objects so that all of them will have the upper edge on the former top edge position of the group
  • aligns selected objects so that it first determines the horizontal axis of objects, and subsequently moves each in the vertical direction so that the horizontal axis of the object lies on this axis
  • aligns the selected objects so that they will all have the bottom edge on the former bottom edge position of the group

The importance of distribution keys (Distribute) is following:

  • from the space between the left and right edge of the group of selected objects the width of individual objects is subtracted and the remaining area is evenly divided between objects. When using this function it depends on the order in which you have selected objects – the object selected first will now be on the far left side, the one selected last on the far right side. This can be used to easily rearrange objects.
  • from the space between the upper and lower edge of the group of selected objects the height of individual objects is subtracted and the remaining area is evenly divided between objects. Again, it depends on the order in which you have selected objects – the object selected first will now be at the top, the one selected last on the bottom.

If a situation occurs with these two functions so that objects will not fit into originally defined width (height), they will be evenly overlaid.

Categories
2. Triobo editor

Audio object

Insert a sound object by using the Audio tool, you can drag the page or click (see Object inserting). The source can be music in MP3 or AIFF or WAV sound formats. The object has the following settings:

  • The icon Triobo audio setting 1 turns on or off audio control display. If controls are not displayed, the audio object is not visible at all and you should make a button for launching.
  • The icon Triobo audio setting 2 is used to turn the repeat audio play function on.
  • The icon Triobo audio setting 3 enables automatic playback when the reader opens the article.