Categories
1. Starting with digital publishing 2. Triobo editor

Default settings for new issues

As soon as you set up a publication, a dialog box to configure default values for all new issues in the publication will appear. This will save you time during further steps. If you are not sure, leave the default values as they are.

default values

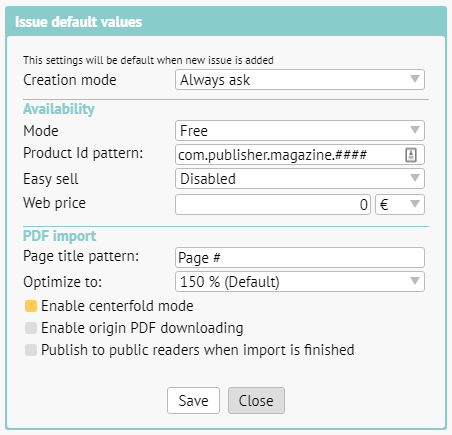
Creation mode: you can set „Import PDF“ (for working with content on PDF basis) or „Create content“ (if you will be creating multimedia content in Triobo editor). If you are not sure, leave the default value. In that case the editor will always give you the option to choose when setting up new issue.

Availability > Mode: here you can choose, if by default new issues will be free of charge, paid, locked or hidden. More in another article.

Availability > Product Id pattern (applies only to paid issues): you can prepare a template for product Ids beforehand. If you set for example com.publisher.magazine.####, the product Ids will automatically be filled in the following form com.publisher.magazine.1, com.publisher.magazine.2 etc. Do not forget, that product Ids need to be approved by Apple and must be set in Google Play. See details.

Availability > Easy sell (applies only to paid issues): suitable for publishers with bigger archive. This enables them to sell content in reader applications even without approving product IDs by Apple and Google.

Availability > Web price (applies only to paid issues): here you can set the price of issue for web purchases.

PDF import > Page title pattern: here you can set, how individual pages shall be named after import. A pattern is used, where instead of the # symbol a page number shall be automatically filled in. On the picture you can see an example “Page #“, which means, that the first page will be named Page 1, second page Page 2 etc. In the editor you can further change the name of every individual page as you wish.

PDF import > Optimize to: we recommend leaving the default value of 150 %, that is the reasonable compromise between quality (required for zooming) and size of data. If you set higher value, it will allow for even greater zoom but at the cost of larger data transfer.

PDF import > Enable centerfold mode: on the display with sufficient aspect ratio the PDF will be displayed in centerfold mode (two pages side by side).

PDF import > Enable origin PDF downloading: suitable for publications free of charge. Readers can also download original PDF on the website, apart from reading.

PDF import > Publish to public readers when import is finished: right after the PDF import is finished an automated process of publishing will begin. If you plan to make further changes to the content before publishing (typically renaming individual pages) leaves this option unchecked.

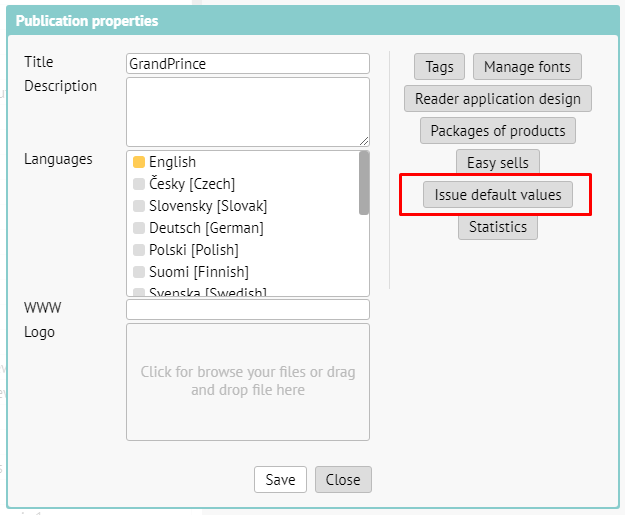
You can also access default value settings afterwards. In publication overview click on the icon [i] for setting up publication properties. After that click on the button Issue default values.

edit of default settings

Categories
2. Triobo editor

Animation

Each object can have also an alternative state in addition to its normal state. By navigation between these two states object animations are created. The object may move, resize, rotate or change the density or orientation in space. Animations can be automatic when an object appears or it is controlled with push buttons.

If the object is set to automatic start, then the animation starts when displayed:

  • if the object is part of paged article it starts by going to this page
  • if the object is part of continuously scrolling article it starts at the moment when it is at least partially visible
  • if the object is part of a variable object it starts by going to its state

Animations can also be automatically played back at the moment when the object disappears (the reader goes to another page, moves and switches the variable object.

Select the object (or group of objects) and press Animation button Triobo button

Animation setting window

Set the animation properties on the left side of the window:

  • Default state is alternate – means that at the beginning the object will be displayed in an alternative position (shifted, magnified, rotated, etc.) and later through the animation it will return to its normal state (thus as is illustrated in the editor). If this option is turned off, it will be just the opposite: the object will be illustrated in its normal position, as it was displayed in the editor, and later assumes the alternative state with animation
  • Switch on show after 0.0 s – if checked, then object animation plays automatically after it is displayed, you can also specify the delay in seconds. This is suitable for example with flying headlines etc. At this time it will switch the object from an alternate to normal, or from normal to alternate state according to the above option
  • Switch on hide – if checked, it will animate the object back when the object disappears from the display
  • Switch on tap – the object itself will respond to touch. Beware of a collision with action setting on tap.

You can also set the object timing i.e. how it will move with time:

  • Default – the default timing method, the object starts up quickly and before the end position slightly slows down
  • Linear – object will move quite evenly from the beginning to end
  • Ease In – object starts to move slowly and reaches the target position quickly
  • Ease Out – object will move quickly but before the end position it slows down a lot
  • Ease In-Out – object will slowly starts then speeds up the motion, before the end position it slows down a lot
  • Overdrive – object starts very quickly, passes the end position and slowly returns back to the target position

The last option is to set the animation length in seconds. If you enter 0, then the object will not animate at all, but goes immediately from one state to another.

In the right part of the window you may then set what will be the alternative state of the object:

  • Opacity – the saturation. If the object is set to its 100% saturation, and you make settings 0%, then the transition from an alternative to the normal state causes that the object appears.
  • Shift X, Y – if the object has to come from the left, enter e.g.-300
  • Zoom – normal magnification is 100% if you want to turn a small object into large one, enter 1%, if on the contrary, it should “drop” into the page, enter e.g. 500%. It is advisable to combine this state with saturation seeting.
  • Rotate X, Y, Z – object rotation in space around selected axis:
    • X – object rotates around an axis that is leading from left to right on the screen, i.e. if you enter 180 for example, it will appear “upside down“
    • Y – object rotates around an axis that is leading from the top down, i.e. if you enter 180 for example, it will appear right-left inverted
    • Z – object rotates about an axis perpendicularly to the face of your monitor, i.e. this turns inside of monitor plane. Remember that the target rotation may not always be 0 if you set the different editor rotation.

Press the button Remove animation to remove the animation.

Hint: You may control animated object by using the On tap command which acts as a button.

Categories
2. Triobo editor 3. Content publishing for tablets 6. Marketing & digital publications

How to create custom reader design

You can study how to set colours and preview modes for an application in separate article. In this article we´ll cover the designing of issues overview. See image below for an example.

Example of custom design

Everyone with the Triobo Professional subscription can customize their design. Those with the subscription see in the issues list of the publication a specially named issue with a single article.

special issue for custom design

Everyone with the Triobo Professional subscription can customize their design. Those with the subscription see in the issues list of the publication a specially named issue with a single article.

Tip: if no object is selected, use W key to see borders of all objects on the page.

The page contains (void) object named __coversP. This object is important, as it renders each individual issues. You shouldn’t delete this object (exception is described below). To see the object, you can use W key. We recommend to place it in the front layer.

Object settings - custom app design

On the screenshot, notice the second blue order at the bottom. It shows the distinction of the editor for design customization. Because the issues overview may be displayed on devices of various dimensions (web, Android and Apple tablets, Windows 10 app etc.), the typesetting in not expressed in absolute coordinates, but everything is aligned to the screen corners or to the middle.

For each object (or group of objects) you can set:

  • Horizontally: align left (default), align to middle, align right or stretch width according to position of right and left edge of the object.
  • Vertically: align to top, align to middle, align to bottom or stretch height according to top and bottom edge of the object.
  • Object: Set if object should be always visible, or only in landscape or portrait tablet orientation. With this, you can easily create designs for specific display orientations.
  • Language: if you design for multilanguage reader application, you can set target language destination for selected object.

TIP: for better arranged work use tags, to show or hide specific objects as needed.

How to replace the cover pages with custom graphics?

In most cases, you’ll want to have visible covers of your issues (typically magazines). Sometimes, however, you want to replace this presentation with your own graphics, such as active icons:

active icons

In this situation, you can delete __coversP object (read above), which renders the cover pages. Or, even better, don’t delete the object and only move it out of the visible area, for example, above the page. Create icons on the page, clickable maps etc. (as you wish), and use On Tap feature of Triobo, Open issue option.

More complex construction

And what if you want to add for example a frame filled with some colour, containing text on the left side aligned to the left, image on the right aligned to the right, and was stretched according to actual width of the screen? That´s simple. First draw the (text) frame, fill it with colour and place the object above it. Frame will be set to spread horizontally. Left object will be aligned to the left same as the right object to the right.

How can you make life easier?

To make your design work better, you can use automatically prepared filters to switch the editor to a specific language and / or orientation. The filters appear in the left column when you have no object selected.

language filter orientation filter

How to test the design

You can publish in Triobo Content Reader as usual. To speed up the design change after publishing, close the Triobo Reader and start it again.

Categories
2. Triobo editor

Variable objects

Variable object is such a group of objects, in which only one of them is always visible.

First select an object (or group) that you want to use as a variable (multilevel), and then click the icon Variable object icon. The left panel shows a list of „Variable object“, in which all the states will be listed – at the beginning the object has only one state. Now, in this panel, click +, which duplicates the selected state.

Double-click the object (which is now shown as a group) through which you will open the selected state for editing. You can now edit the object which is located in this state: i.e. if it is for example an image, tapping will display a dialog box to change the image source.

Variable object can have any number of states. Their order is set with arrows Order icon status below the list of states. Any state can be also removed by clicking on the cross icon.

Hint: The state of variable object can be a group of objects, such as an image with a caption, or multiple images with multiple texts. It is easier to create variable objects first by creating a typical situation (e.g. grouped file with label). When the condition of variable object is a simple object (text, image …) and you need to add more objects to the state, then first change a single object to a group with Group icon (= create a “group” from one object).

Click on the icon to set the variable object.

Setting properties of variable object

Here you can choose how the variable object will react during browsing:

  • None – the object itself is not active. It is necessary to switch states with actions of other objects (see below)
  • Tap to next state – clicking an object changes the state to the next one
  • Swipe to next/previous state – dragging over the object switches to the next/previous state
  • Switch to state according drag length – dragging over the object gradually switches between states. The Sensitivity item determines the sensitivity. The more the reader drags the more he must to run over with his finger before the next state displays.

Animation between the states Here you can choose which kind of animation will be used during the transition between individual states:

  • None – no animation, the following state is displayed immediately
  • Crossfade – blending
  • Swipe Left/Right – when switching to a state with higher ranking the older status leaves to the left and a newer will come from the right
  • Swipe Up/Down – the same in vertical direction
  • Zoom in – the original state is enlarged towards the user, the new one will replace it from behind
  • 3D – objects are moving in space
  • Quick swipe – quick move left/right with blending

All effects can be set by using the length parameter Length. Length is in seconds.

Item Use State 0 turns on the special State 0, in which there is no visible state of the object. Usage is explained in the article Variable objects, advanced techniques

The Dots item is used to display the dots under the variable object. Use the Color to select the color, you can also choose the background color under the dots by Background, or consequently set the color to [No color]. You can test the dot display in preview to view dots. They appear at the bottom section of a variable object on the strip with a height 16 pixels. If you want to achieve that the dots will not overlap over individual states, you may finally increase the height of variable object just by 16 pixels.

Item * Autoplay * enables automatic switching of individual states after the object is displayed. The speed ​​is defined as the time between the switching of states in seconds.

Alternative creation of variable objects

The second way how to create variable objects is to draw the individual objects separately. Then select them with mouse (in required order with Shift key depressed) and then press the button – individual objects will become individual states, all of them will be placed to the upper left corner of created variable object.

Variable object can also be divided in a similar way as any other group using the Enter image description here button – the states are then displayed net to each other. This may be utilized so that you can edit individual objects and then regroup them into a variable object.

Categories
2. Triobo editor

Colors and their settings

The dialog for color setting appears whenever you set the background color of the object, its margins, font color, etc. Triobo is additionally using the opacity beside the hue, saturation and brightness. In previews opacity is indicated by transparent square grid – in reality the transparent color shows in such way that you can partially see the background beneath the color.

Mixing colors

The dialog for color selection contains three sections. The middle section contains two tabs. Color mixing makes the color selection easier in the HSB color model: you just select the hue value (H = hue) as an angle from 0 to 359 °, saturation (S = saturation) and color brightness (B = brightness), both values from 0-100%. The color spectrum also corresponds to this model: clicking with mouse you select hue (horizontal) and saturation (vertical). The change of brightness (B) will also change the brightness on color spectrum for better indication.

The second tab of Triobo Palette is used for quick selection of 90 preset colors. By clicking the color you immediately select it.

The right section displays two previews at the top: on the left it shows color before changes, the right one displays currently selected color. Then the settings of RGB model are displayed, where you set the brightness in values from 0 to 255 of each light component of color (R = red, G = green, B = blue). The CMYK model is set correspondingly to four printing colors (C = Cyan, M = Magenta, Y = Yellow and K = Black).

The section Web is used for entering of values as used in HTML. You can either specify six characters (equivalent to three two-digit hexadecimal data) or only three of them which will be automatically translated to six characters by duplicating individual characters. (example 75a is overwritten to 7755aa)

The last pull bar sets color opacity. In some cases, this option can be disabled.

All pull bars can be controlled with mouse or by entering their numeric value. If the cursor is in a numeric field, you can change the values with up and down arrows. If you hold down the Alt key, the value will change by 8.

Issue palette

On the left section you find issue palette. If you have already mixed color, you can save it to the palette by pressing the plus button. If you’ve previously selected the color from the palette and edited it, you can save it by pressing Save button. In both cases, a dialog for color name appears. When name colors you can click Automatic button, and color will be renamed according to its values ​​in the RGB color model. (next time when you change the value of automatically set name, the name will be again changed automatically according to its current color)

Up and down arrows change the order of colors, the cross is used to delete a color from the palette. Double-click the color name for immediate use.

Importance of translucent colors

The advantage of translucent colors is that they can be used for effects when you need the object itself to be completely covered, but to show the picture through its background. Typically it may be the black color with 70% opacity as a text box background with otherwise white letters. While the white letters (use 255, 255, 255, 100% color) will entirely cover the background and will be contrasting, the black color will only darken the picture behind the object.

Example of translucent color

Categories
2. Triobo editor

Article properties

Unless there is no object selected during the page editing then the button is available, which opens the setup of article properties:

enter image description here

The first part refers to the “page setup”, i.e. the background of the page: in addition to color it can also specifies its texture. If you want the page to look optimal also on devices with Retina display, use the HD option and prepare the text with double the resolution – for the full page 768 x 1024 then prepare the image size of 1536 x 2048.

Select the option box Align page if you want the devices with a different aspect ratio from your prepared layout, to have page vertically centered. Common iPad page prepared in publication in portrait mode will be displayed on android screen with black bars on the top and bottom.

The photo gallery setup is also available:

  • Background – background color or gallery texture. For the texture that was prepared for tablets with Retina resolution press the HD
  • Border – photography border size
  • Bottom – increases the bottom edge, when the value is zero then the image label will be displayed in this space. When set to zero, also no image captions will be visible
  • Border – photograph border, color and edge thickness. If set to zero, the edge will not be visible
  • Shadow – shadow is specified as an offset in horizontal and vertical direction, size and color. If all numeric values are zero, the shadow is not visible
  • Dots – enables/disables dot rendering at the bottom of the screen that represents individual photos. You can adjust the dot color. Inactive dots are transparent.
  • Caption images style option – chooses the style that will be used to describe photos. Remember to set the color of text so that the text is visible on selected background. The alignment also has its importance next to the font and font size, including left and right margins and lines on the sides

The last option (global settings) determines whether the currently selected settings will be saved as the setting of currently edited article, or as a global setting of the whole issue. In such case, the changes affect all issues which have not saved their default settings.

If the article has its own settings (independent from global issue setting), this can be removed with the Remove button – subsequently a global settings will be used.

Categories
2. Triobo editor

Purchases – unit purchases and subscriptions

Whether the reader receives access to issue depends on the Product ID and publication date.

Product ID is an identifier that you will use with iTunes Connect (or Google Play) interface. With this interface that you have to set up with Apple/Google you further identify what issues you sell and at what price. Product ID serves as identification of your reader and further differentiation attributes. The reverse entry is used in similar way as with internet address, only reversed. So if you have a company MyPub and issue monthly magazine called MyTimes, then the reader identifier will be cz.mypub.mytime – remember you cannot change the identifier later!

Then the issue identifier (Product ID) text for January issue 2012 the may look like this cz.mypub.mytime.1201

In the App Store (store operated by Apple) or Google Play (run by Google) the reader purchases just this identifier and it cannot be changed later in any way. So once you sell the Product ID cz.mypub.mytime.1201 to your reader, it should always be available for release with this Product ID.

Second way the reader can access the issue is the subscription. At this moment the subscription is only possible to sell through the App Store. In real terms, this is a purchasing period (not a number of pieces). If reader purchases on monthly subscription, such as 8th September 2012, then the prepaid period is 8th September to 7th October 2012. If within 24 hours before the end of the subscription the automatic renewal is not cancelled, it will be then renewed and thus extended from 8th September to 7th November 2012. Again, if the renewal is not canceled, another credit card payment will be effective, etc.

The Triobo reader offers such issues to its readers, whose release date falls within the paid period, plus extra one issue that is current at the time of purchase (this is the Apple’s rule). So thus imagine any issue not by the date it comes out, but as the interval between the date it is issued and the date of the next issue. The reader gets access to all issues that intersect with the interval of subscription.

Subscription example

Issues 1, 2 and 3 were published on 15th January, 15th February and 15th March. The reader had paid a monthly subscription on 3rd February and discontinued it on 8th February (to avoid automatic renewal). He has therefore paid for the interval from 3rd February to 2nd March. At the time of purchase he has received the issue number 1. Once the issue number 2 is published on 15th February he will get it as well. However he will not receive the third issue.

If you later uninstall the reader and then reinstall it again (or even install it on another tablet/phone) and enter the function Refresh purchases, you will re-access the number 1 and 2 issues.

Note that by purchasing on monthly subscription the reader had received two editions: and therefore has the right to number 1 issue, even though he has paid on 3rd February and the issue already came out on 15th January. At the time of purchase the subscription was still “valid”.

Therefore when setting the subscription price take into account the following:

  • the reader usually gets about one extra issue than it would correspond to the subscription length
  • If the journal is published irregularly (e.g. in the summer a double issue is published in July), it may happen that the reader will not receive any new issue within the subscription period
  • it may also happen that if you are not using the exact date of the month the reader receives only 11 issues for a yearly subscription

The reader should be notified about all these facts. In the event that the reader will want to complain about subscription purchase, he will not be able to resolve anything with the publisher nor the Triobo operator – because the seller is Apple. However the Apple does not guarantee that any issue is published within the purchase interval and rejects the claim. However these are pitfalls of “time subscription”.

Categories
2. Triobo editor

New issue and editing

You can create issues in the publication. The issue is an independent unit, that will be downloaded by user to his device. Click on button Plus in bottom part of listings. Depending on how you set Default issue values, you will see either dialog asking, if you want to create new issue using PDF import or you want to start creating empty issue, or directly new dialog for PDF import or settings of empty issue appears.

New issue creating options

Both dialogs are similar, just in case of importing PDF some properties is set automatically.

Title of issue is short name, f.e. 1/2018, 18/01, or Preview. It is unnecessary to repeat the name of the publication, because the reader will always see more information about the publication, including its name.

The date determines the order in which issues is displayed, the most recent issues are always at the beginning.

Write the most interesting points from the issue to the Description field. Ideally, copy the main headlines from cover. This text will be also always displayed and will greatly helpful for search engines like Google or Bing.

If the publication is multilingual, chose which languages the issue appears in. Similarly, if the publication contains tags, choose there the issue will be presented.

In the availability section, set whether the issue is free, paid, locked or hidden:

  • free issues are available to anybody, who installs the reader application (or visits website with your publication)
  • paid issues have to be purchased first. The user can purchase the issue using iTunesConnect/GooglePlay, or on website using his payment card. Issues will be also enabled in case they are in the period of a paid subscription. If your publication is assigned to a Readers zone, the user can obtain access to the issue also using appropriate voucher.
  • locked issues can be obtained via Readers zone only: either by voucher, or you can unlock the issue to him in editor
  • hidden issues are similar to locked ones, but the user cannot see them until they are enabled

All non-free issues has to have its own specific ProductId – this is a text code, that is also entered in Apple iTunesConnect and Google Play. In these markets you will also determine its price. The ProductId can be also linked to a voucher of Readers zone, or directly linked to any user. Follow the recommended ProductId pattern, f.e. com.mycompany.mymonthly.1234, where 1234 can be either a sequence number, or, for example, 1801 for the first issue of year 2018.

New issue

Easy sells enables to use consumable ProductId, see more in a separate article.

Web price is the price, for that readers can buy the issue on portal Triobo (or your e-shop). Prices in individual markets iTunesConnect, GooglePlay, Triobo Portal may vary, and it is up to you as you set them up. However, it is not possible to automatically link them.

In section Readers zone you can set behaviour of the issue depending on whether the user is logged in to the Readers Zone. You can also disable access to not logged in users. In connection with setting of the readers zone (specifically, whether the readers can register for free)m you can achieve many ways to make the content readable or accessible only to selected readers.

If you are creating content, you have the option to choose the default issue dimensions on the right, both for tablet layouts and separately for mobile layouts. In particular, you specify the default issue orientation (portrait or landscape). For PDF import, these values are determined by the embedded PDF.

Editing

Later, you can access the editing settings using the [i] icon at the beginning of the line in the list of issues. The following buttons will appear at the bottom:

  • Delete – deletes the issue and all its articles. The deleted issue moves to the trash for 30 days from where you can restore it. After 30 days, however, it will be permanently deleted and can not be restored.
  • Preview – Opens a new window with a quick issue preview
  • Copy – Allows you to copy the issue. When copying to another publication, it is also possible to copy used fonts. In the copy dialog, you can name the copy and change the publishing date.
  • Publish – opens the publishing dialog
  • Size – Shows the size of the resources of each article (pictures, videos, sounds, fonts …)
  • Export – Packages the entire issue into a file that you can download to your disk. The packed issue can be re-imported back into the Triobo system later.
  • PDF import – invokes the PDF import dialog – the imported pages are added to the end
Categories
2. Triobo editor

Article layout (tablet vs. phone)

For iPad the basic article layouts exist (and other tablet-size 7-10 “), ie. either 768 x 1024 or 1024 x 768. These layouts also serve well for iPad with Retina resolution (generally also for other tablets that have double the pixel resolution).

In addition to basic layouts you can also establish an alternative mobile phone layout for each article.

If your reader is universal for iPad and iPhone and you will not create an alternative layout, because the user will see the same (i.e. reduced) data on the iPhone. The situation is similar in a reader device for tablets/Android phones.

However, if you create alternative layouts for phones, you may provide a better graphical processing of your issue on iPhone and Android phones.

Layout setup for phones

Click on a page number to view menu how to work with individual pages:

Triobo editor layouts

This icon indicates tablet layout (also indicates landscape or portrait layout). Clicking the phone layout icon calls up the dialog box:

Triobo editor layout query

The Duplicate option may require that all objects from a tablet layout are also copied into the layout for the phone. Since the layout of the phone has basic size of 320 x 480, all objects are automatically reduced by half.

Switching between layouts

Once article exists in two layouts, you can switch between them within the same menu. If you have a tablet layout displayed (default), you can delete the phone layout:

Triobo editor layouts 2

Text styles in alternative layouts

Each text style has two forms after the establishment of alternative layout: the phone one arises from a tablet form by reducing it by half. That is usually too little, but you can increase the font again. You will then need to adjust the size of text frames so that the enlarged font fits them well.

Categories
2. Triobo editor

Article editing, basics

Opening of the article (right arrow next to the article title) will switch the Triobo editor to article editing mode. In the left column you can see basic information:

  • top line with publication name, issue and article. Click on any item will exit the editor and swith you to a view of relevant item. In case of unsaved changes, you will be asked whether you want to actually leave the article.
  • information bar contains:
    • Page: page number (if the article has a number of separate pages)
    • Zoom: zoom settings (magnifying)
    • Guides: guides settings
    • Save button – If it is red, the editor changes has been made and it is necessary to press this button to save – you can use keyboard shortcut Ctrl + S (Windows) or Cmd + S (OS X). While saving the progressbar shows, at this point do not close the browser window!
    • Preview button – opens a separate window simulating the tablet screen of Apple iPad. Using items 100%, 75%, 50% and 25% can reduce the image preview. When viewing a multi-page article, you can move between pages using the up and down keys
    • Close button – closes the article and returns to the overview of articles. If changes areunsaved, you will be asked whether you want to actually leave the article.
  • bar with new object creation functions:
  • Position bar, informs about cursor location

upper menu part of Triobo editor

The page area of an article is marked with white color, objects can be placed outside as well. They will not be displayed to readers, but may serve as a library of your objects – they are readily at hand. Additionally, images placed outside of page area will not be directly shown, however, they may be part of the photo gallery.

There are two types of articles: smooth scroling and paged. Smooth scrolling content has the same width as the size of iPad display and variable height. You can adjust the height with pull bar, which is located below the page. The reader may move smoothly up and down within such article.

Paged content contains multiple pages, and these all are of the same size and exactly fit iPad screens. The reader then does not scroll smoothly through such content, but jumps up and down through the pages. To create a new page in editor click the item Page, where the icon appears to create a new page. If you have increased the page size with pull bar (and article mode is thus smoothly scrolled), you cannot create a new page – first reduce the page size back to its original size. Conversely, if you create multiple pages, the pull bar for adjusting of page size will disappear. Pages can be deleted by selecting them (selected page has a highlighted borders) and in the Page menu, select delete pages. Entire content of seleted page will also be deleted!

In the same menu you can also change the order of pages with icons Change page order

For longer text articles we recommend using smooth scrolling articles.